There are many flexible methods for installing outdoor porcelain tiles depending on the substrate, surface and specifics of the site. Whilst we recommend you always refer to the manufacturer’s instructions for each particular product and consult with a qualified technician, we have provided some ‘Installation Rough Guides’ to provide an overview of the suitable applications and relatively straightforward methods of fitting these exciting new alternatives to traditional exterior paving.
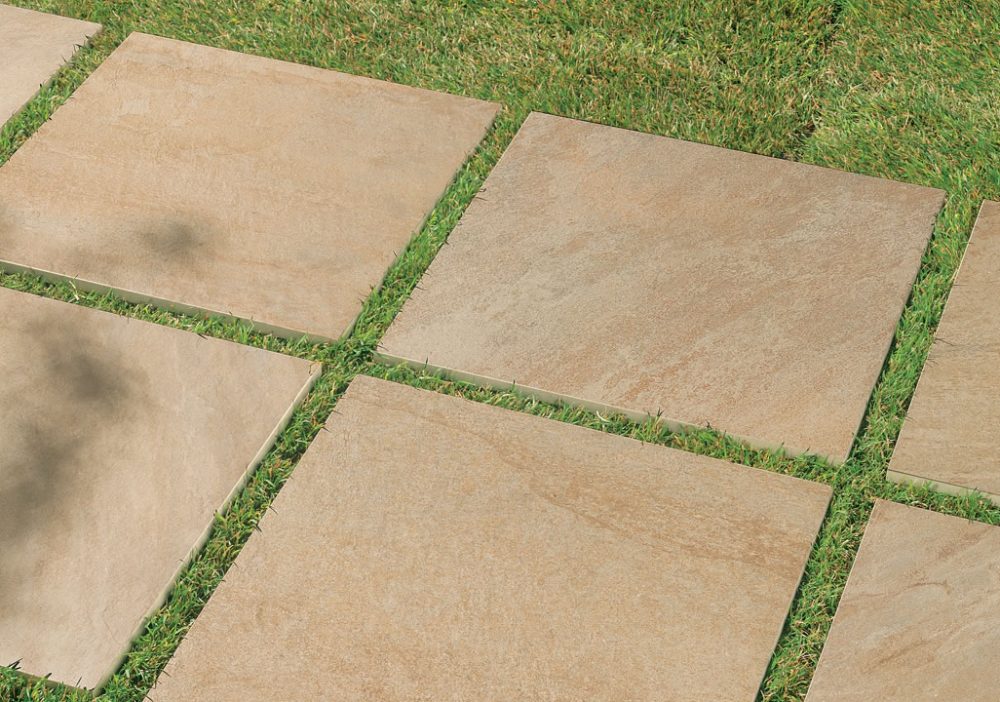
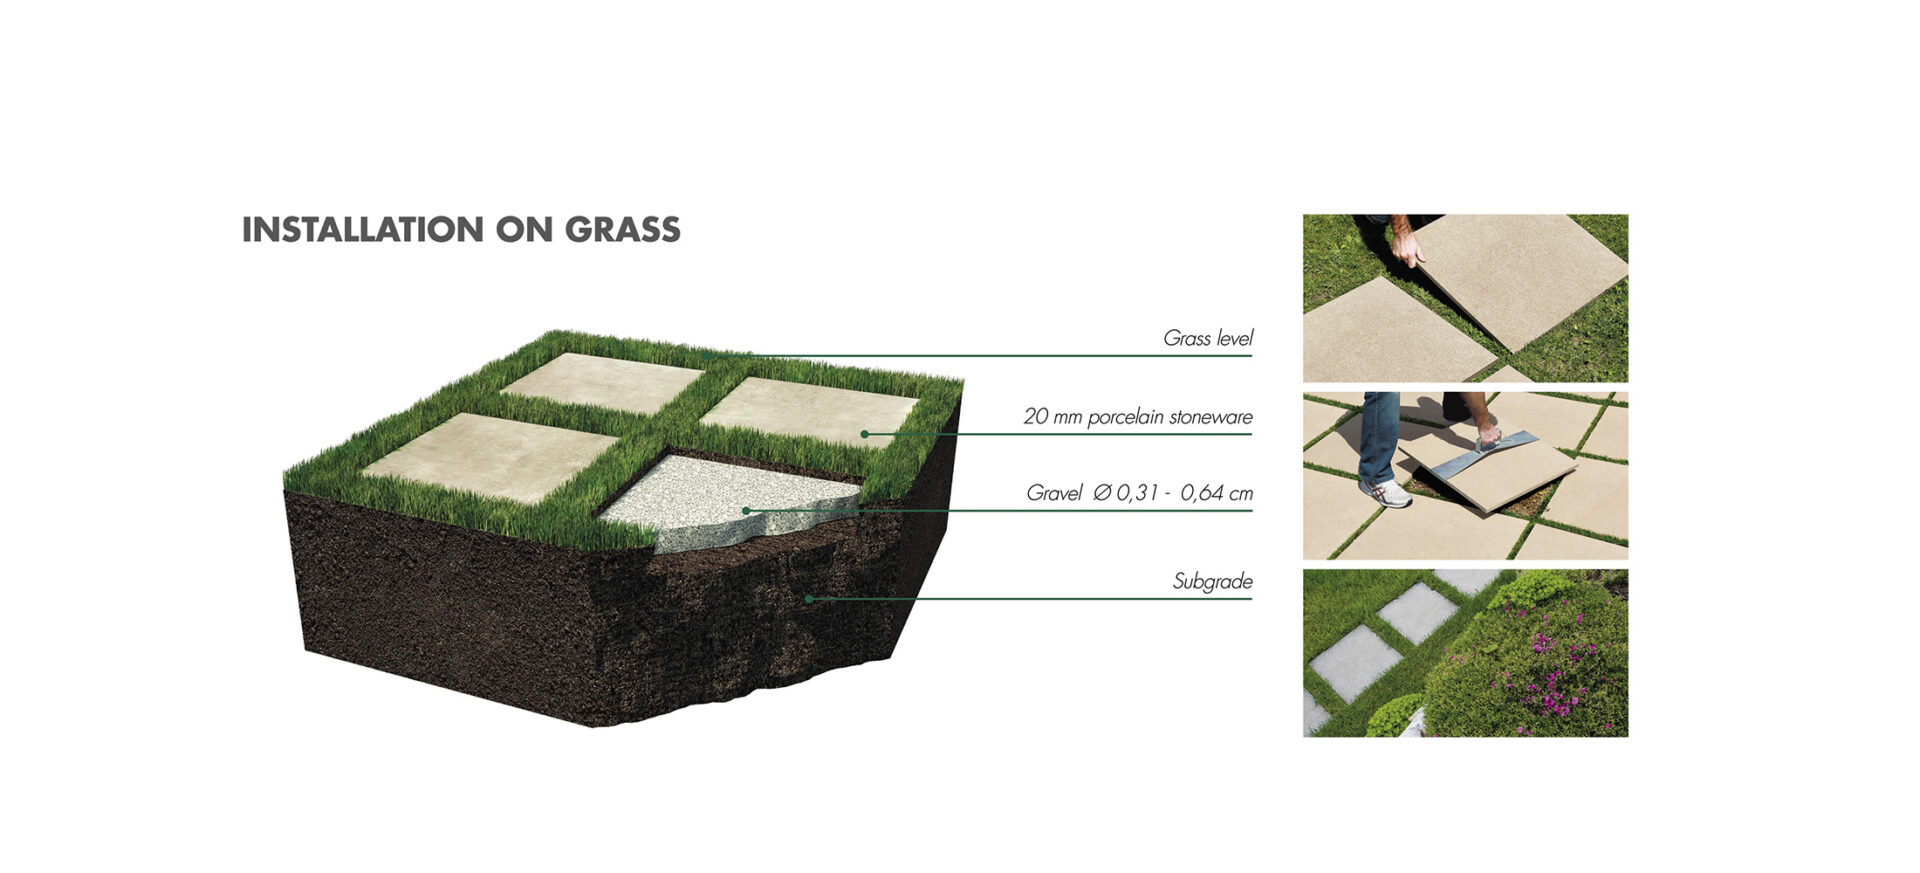
Grass Installation
Ideal for:
- Foot traffic
- Patios
- Seating areas
- Creating walkways
Pro’s
- Fastest method of installation
- Cost effective
- No need to factor in drainage
- Easy to replace
Con’s
- Limited to foot traffic only
- Can be an issue if using mobility aids / prams etc
Method 1 (laying directly on top of grass)
- Measure area to gauge what size spacing will be required to achieve full tiles throughout (not essential but aesthetically more pleasing).
- Lay slab directly on top of grass.
Method 2 (inset into soil with top of slab flush with lawn level)
- Measure area to gauge what size spacing will be required to achieve full tiles throughout (not essential but aesthetically more pleasing).
- Dig out 5-8cm of turf and soil.
- Depending on the manufacturer’s instructions and conditions of the site, a layer of geotextile may be used between the soil and gravel.
- Add a volume of relatively fine gravel so that when the slab is laid on the gravel, the top surface of the slab lays flush with the top level of the soil. This protects a lawnmower from damage when cutting the grass and also provides more stability when the slab is walked on.
- Compact the gravel.
- Lay the slabs and ensure they are stable.
Key points
- Grass installations are only suitable for foot traffic.
- Drainage must always be factored in when installing floors externally. Falls in the floor should always be made with a gradient of no less than 2%.
- Prior to excavating, the site should be checked for any potential pipes or electricity cables.
- Incorrect installation can result in unstable tiles and a risk of injury.
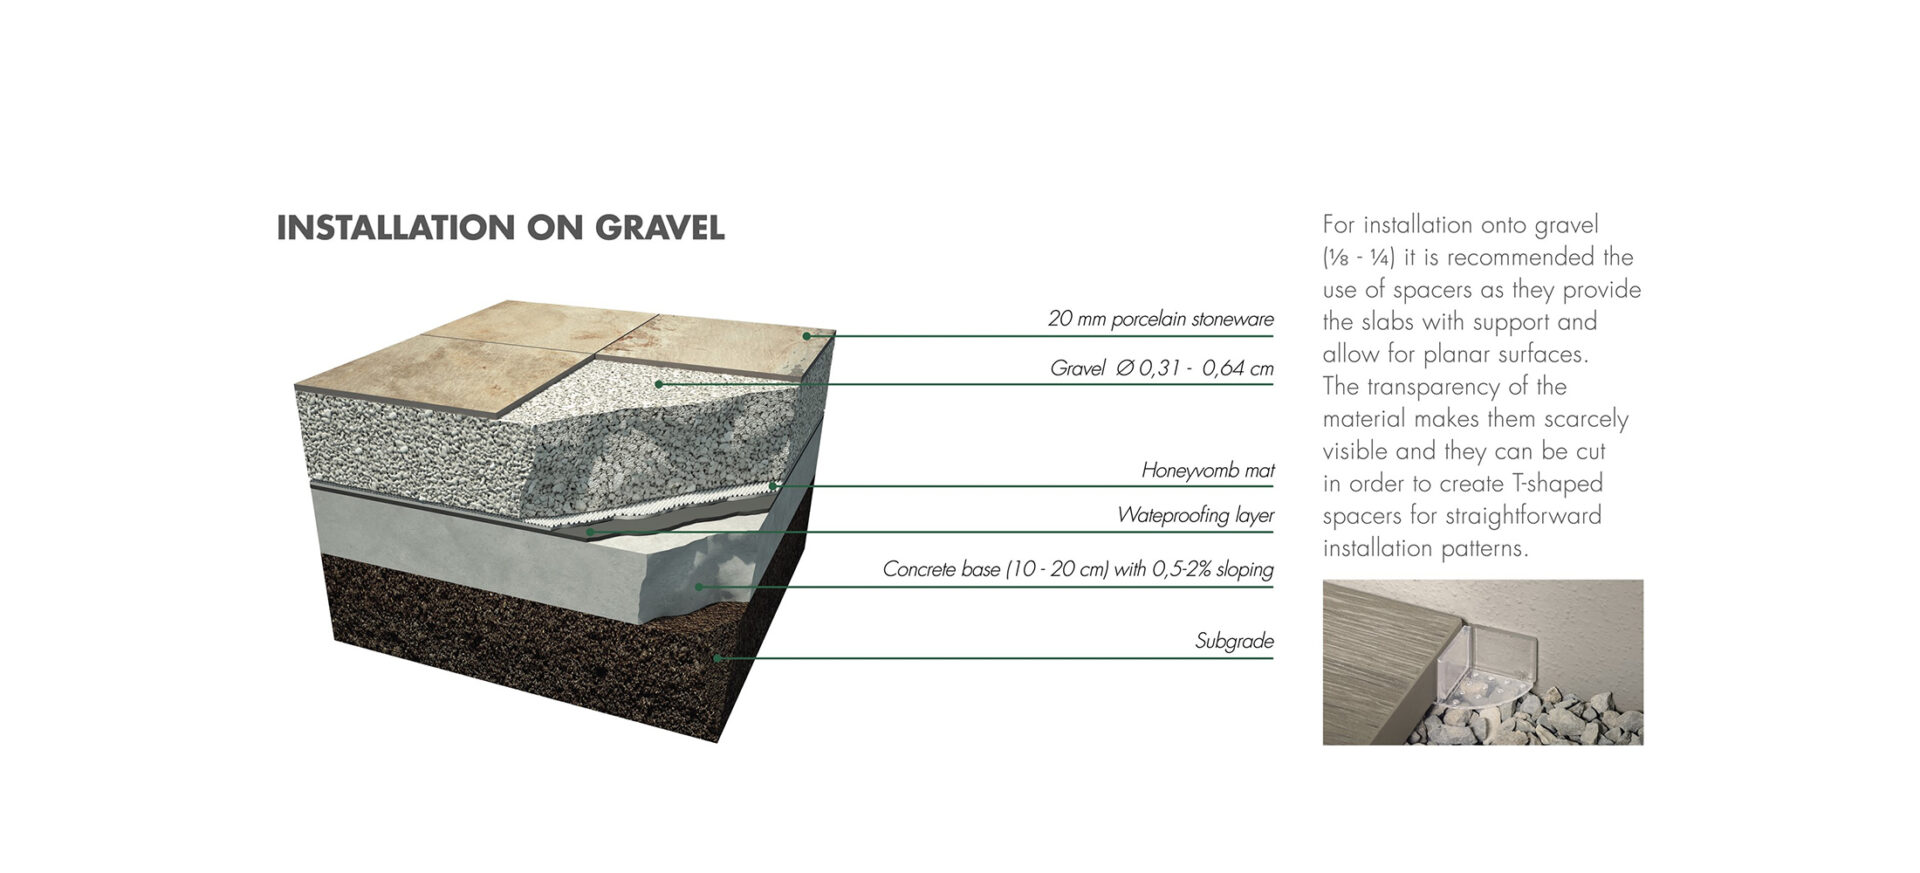
Gravel / Sand Installation
Ideal For:
- When permanent floor laying is not possible
- Foot traffic
- Patios
- Seating areas
- Creating walkways

Pro’s
- Faster method of installation
- Simpler method of drainage
- Easy to replace
- Joints can be filled with decorative gravel
Con’s
- Limited to foot traffic only
Method – where substrate is either earth or concrete
- The exact method of installation will depend on whether the substrate is concrete or earth, the conditions of the site and the specific instructions of different manufacturers.
- Appropriate drainage should always be factored in and any fall made with a gradient of no less than 2%, which must be maintained as the layers are built up.
- When installing on earth, dig soil to the required depth and compact. Prior to adding any gravel, install a layer of appropriate geotextile onto the earth to prevent contamination between layers and ensuring stability.
- Additional layers of vapor barrier or thermal insulation may also be used depending on the manufacturer’s instructions.
- When installing on concrete, prior to adding any gravel, install a waterproof membrane onto the concrete and a honeycomb mat to improve lateral drainage and to protect the waterproof membrane.
- Thereafter, when installing using gravel or sand, layers of different-sized gravel and/or sand are built-up to the surface level to create a solid base with sufficient drainage.
- The tiles should be laid with a minimum 4mm gap between tiles to allow water drainage. An appropriate spacer (e.g. G-Plus spacer) is advised to ensure slabs don’t move laterally when being walked on.
- Please do not hesitate to ask us for further advice and we recommend you always refer to the manufacturers’ instructions for the particular tile specification.
Key points
- A qualified technician should be consulted prior to undertaking any work so the appropriate thickness of base layers can be calculated according to intended use and stressing load.
- Drainage must always be factored in when installing floors externally. Falls in the floor should be made with a gradient of no less than 2%.
- Ideally a perimeter of sorts should be installed (or already exists i.e. the house / brick wall etc) to prevent lateral movement of tiles.
- Prior to excavating, the site should be checked for any potential pipes or electricity cables.
- Incorrect installation can result in unstable tiles and a risk of injury.
Raised Pedestal Installation
Ideal For:
- When permanent floor laying is not possible
- Hiding pipes / cables / manholes etc
- Creating access points in floor
- Foot traffic
- Patios
- Seating areas
- Creating walkways

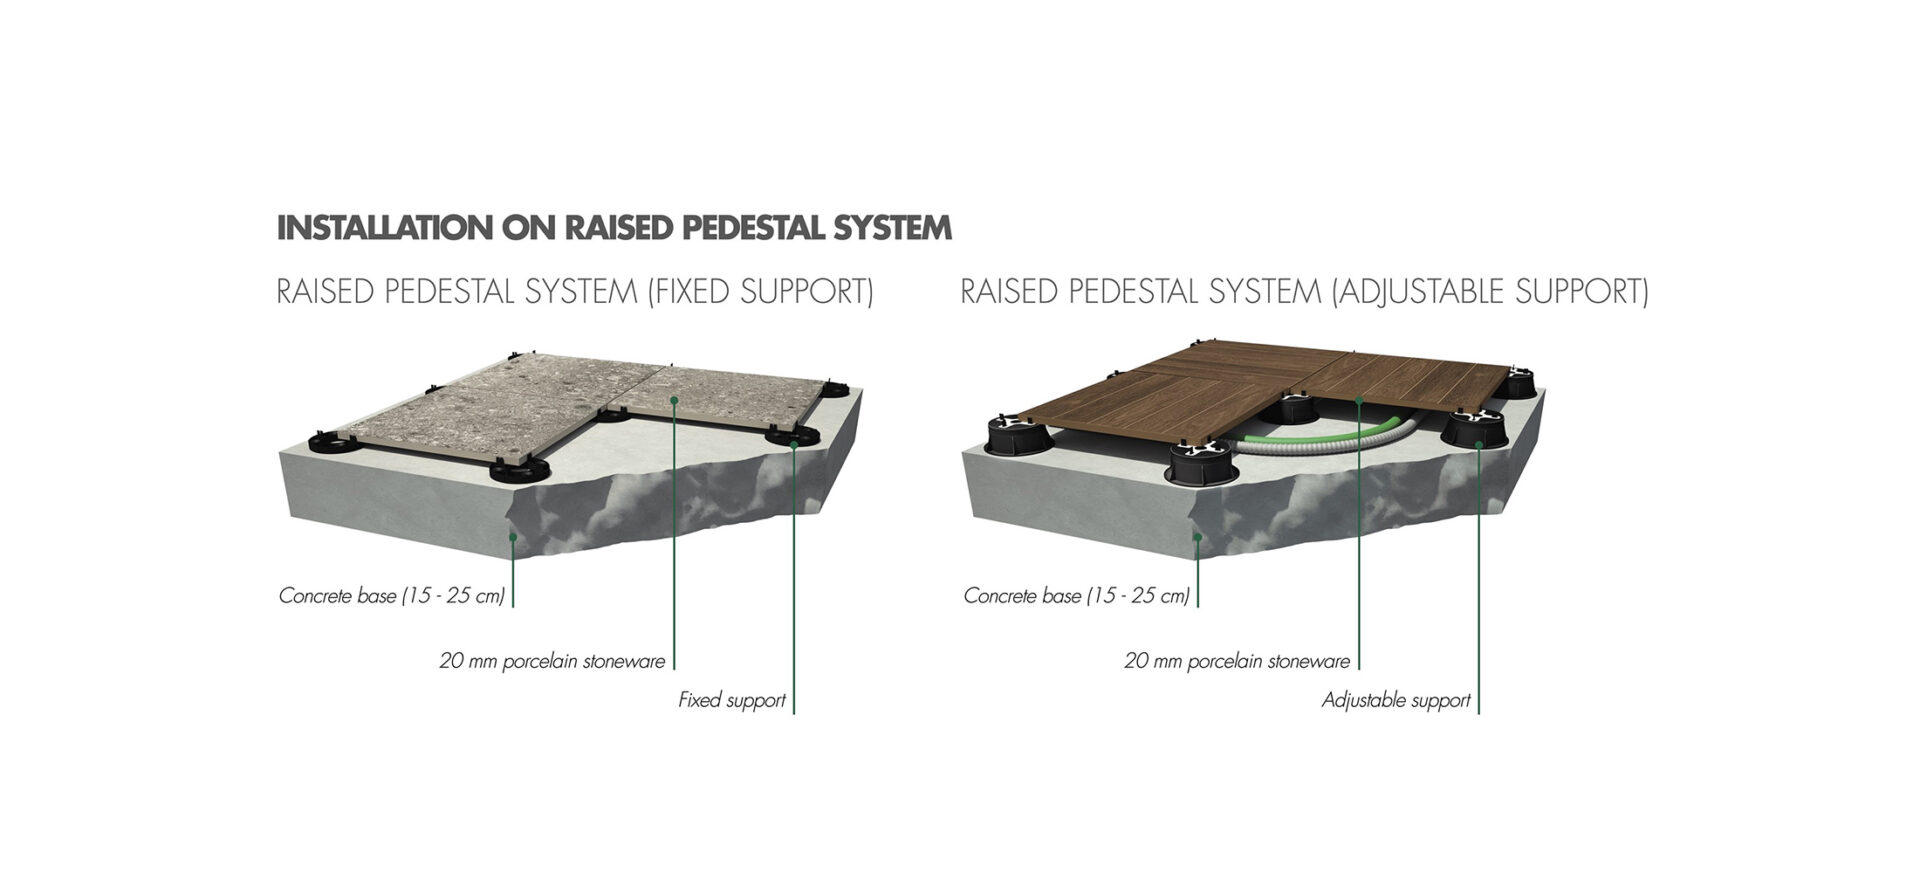
Pro’s
- Provides a cavity within which to conceal pipes / cables / manholes etc
- Easy to replace
- Floor can be raised up to 1 metre with minimal increase in overall floor weight (If using pedestals greater than 10cm high a fibreglass mesh reinforcement will need to be applied to the back of the tile)
Con’s
- Limited to foot traffic only
Method
- Ensure the concrete base / screed is suitable for the intended use and conditions of the site.
- Ensure appropriate drainage has been factored in. Any falls to be made with a gradient of no less than 2%.
- Lay tiles using raised pedestal system.
Key points
- A qualified technician should be consulted prior to undertaking any work so the appropriate thickness of base layers can be calculated according to intended use and stressing load.
- Drainage must be factored in when installing floors externally.
- Ideally a perimeter of sorts is installed (or already exists i.e. the house / brick wall etc) to prevent lateral movement of tiles.
- Perimeters should be sealed to avoid pests.
- Take care not to fix tiles higher than damp course.
- Anything above ground level is subject to wind so installation should be assessed with this in mind.
- If using pedestals greater than 10cm high a fibreglass mesh reinforcement will need to be applied to the back of the tile.
- If using tiles greater than 60x60cm with the raised pedestal method of installation it is advised to apply a fiberglass mesh reinforcement to the tile or choose an alternative pedestal system such as the e_base system from Mirage
- Prior to excavating, the site should be checked for any potential pipes or electricity cables.
- Incorrect installation can result in unstable tiles and a risk of injury.
Adhesive Installation
Ideal for:
- Light and heavy traffic including vehicles
- Patios
- Driveways
- Seating areas
- Creating walkways
- Replicating adjoining interior floor tiles


Pro’s
- Highest load bearing method of installation
- Joints will be grouted so this is the best method of installation if wanting to replicate the look of interior floor tiles
Con’s
- Concrete base and screed will need to be left to dry and therefore this can be a more time-consuming method of installation
Method
- Ensure the concrete base / screed is suitable for the intended use and conditions of the site.
- Ensure appropriate drainage has been factored in. Any falls to be made with a gradient of no less than 2%.
- Lay tile with suitable adhesive and minimum 2mm grout joints.
Key points
- A qualified technician should be consulted prior to undertaking any work so the appropriate thickness of base layers can be calculated according to intended use and stressing load.
- Drainage must always be factored in when installing floors externally. Falls in the floor should be made with a gradient of no less than 2%.
- Prior to excavating, the site should be checked for any potential pipes or electricity cables.
- DPM’s, geotextile membranes and uncoupling membranes are an option with this type of installation. Please refer to the manufacturer’s instructions and consult with a qualified technician prior to carrying out any work.
- Incorrect installation can result in unstable tiles and a risk of injury.